
How To Control LED With IR Remote And Arduino UNO|Topped With Fun|Basic Arduino UNO Project With LED
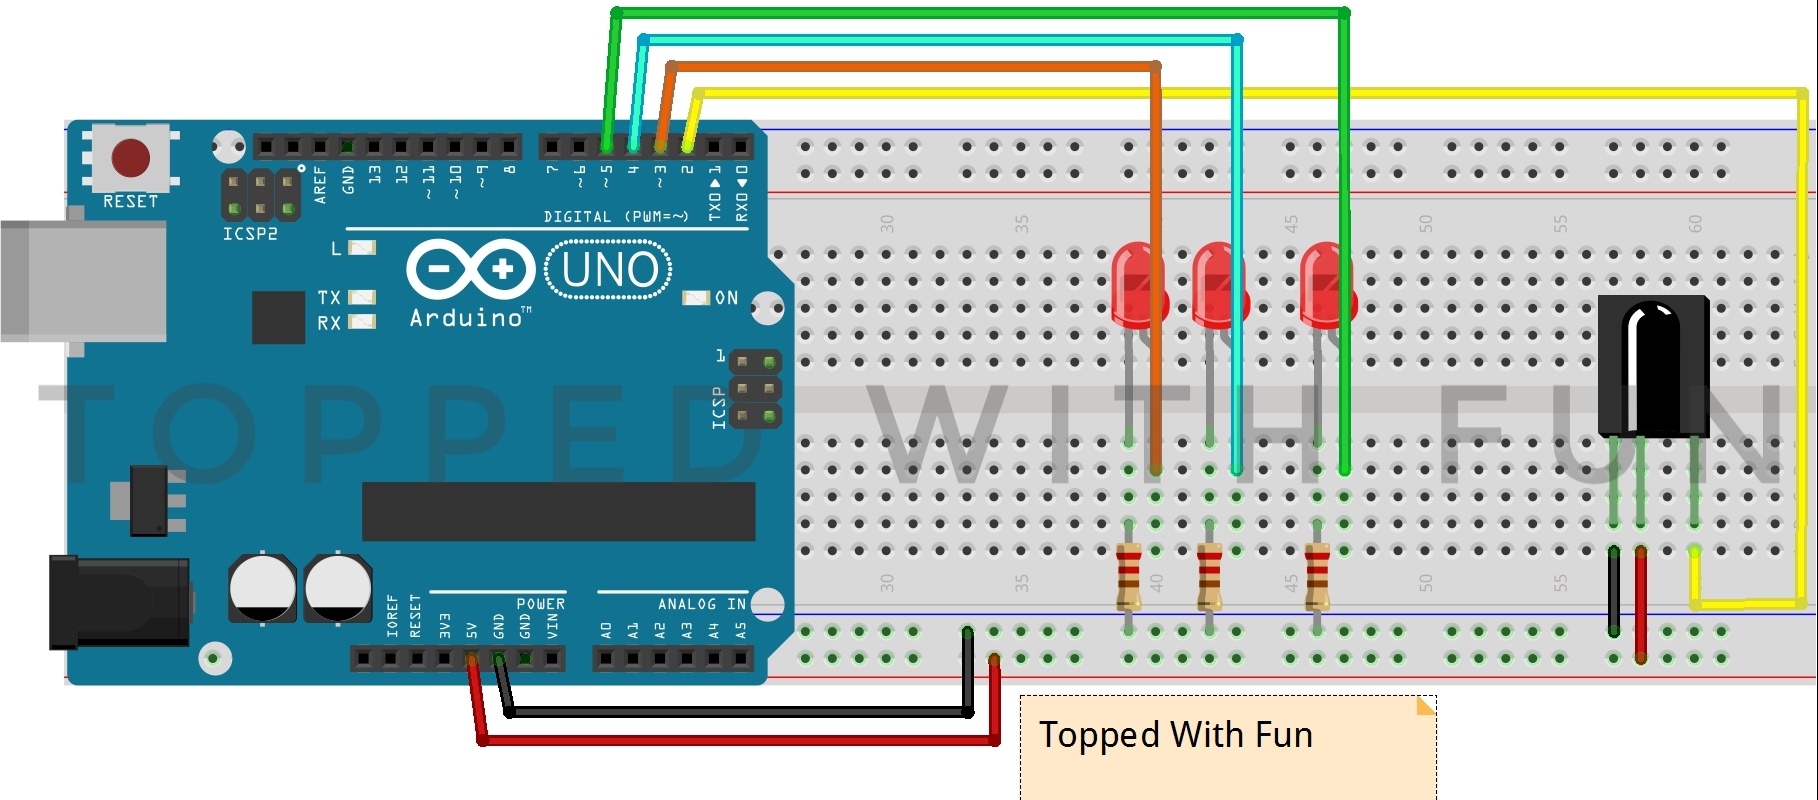


 Circuit Diagram:


IR Decoder:-

#include <IRremote.h>

int IRpin = 2;
IRrecv irrecv(IRpin);
decode_results results;

void setup()
{
Serial.begin(9600);
irrecv.enableIRIn(); // Start the receiver
}

void loop()
{
if (irrecv.decode(&results))
{
Serial.println(results.value, DEC); // Print the Serial ‘results.value’
irrecv.resume(); // Receive the next value
}


}


IR Conroller:-


#include <IRremote.h>              //Includes IR Library

int RECV_PIN = 2;                   //IR Receiver Pin
IRrecv irrecv(RECV_PIN);
decode_results results;

#define BUTTON_1 0x1            //Paste Code Of 1st Button
#define BUTTON_2 0x2           //Paste Code Of 2nd Button
#define BUTTON_3 0x3          //Paste Code Of 3rd Button
#define BUTTON_0 0x33       //Paste Code Of 4th Button
#define BUTTON_OK 0x35   //Paste Code Of 5th Button

int blue_LED = 7;
int red_LED = 6;
int green_LED = 5;


void setup()
{
  pinMode(blue_LED, OUTPUT);
  pinMode(red_LED, OUTPUT);
  pinMode(green_LED, OUTPUT);
  
  irrecv.enableIRIn();
}
void loop() {

  if (irrecv.decode(&results))
  {
    if (results.value == BUTTON_0)
    {
      digitalWrite(blue_LED, LOW);
      digitalWrite(red_LED, LOW);
      digitalWrite(green_LED, LOW);
    }
    if (results.value == BUTTON_OK)
    {
      digitalWrite(blue_LED, HIGH);
      digitalWrite(red_LED, HIGH);
      digitalWrite(green_LED, HIGH);
    }
    if (results.value == BUTTON_1)
    {
      digitalWrite(blue_LED, HIGH);
    }
    if (results.value == BUTTON_2)
    {
      digitalWrite(red_LED, HIGH);
    }
    if (results.value == BUTTON_3)
    {
      digitalWrite(green_LED, HIGH);
    }
    irrecv.resume();
  }
}

Comments

Popular posts from this blog

IOT Based Heart Rate And SpO2 Tracker With NodeMCU MAX30100 And Blynk Application With Code Diagram

Circuit Diagram: SCL PIN - D1 , SDA PIN - D2 , INT PIN - D0 Code: #include <Wire.h> #include "MAX30100_PulseOximeter.h" #define BLYNK_PRINT Serial #include <Blynk.h> #include <ESP8266WiFi.h> #include <BlynkSimpleEsp8266.h> #include "Adafruit_GFX.h" #include "OakOLED.h" #define REPORTING_PERIOD_MS 1000 OakOLED oled; char auth[] = "*********************";             // Authentication Token Sent by Blynk char ssid[] = "********************";        //WiFi SSID char pass[] = "*********************";        //WiFi Password // Connections : SCL PIN - D1 , SDA PIN - D2 , INT PIN - D0 PulseOximeter pox; float BPM, SpO2; uint32_t tsLastReport = 0; const unsigned char bitmap [] PROGMEM = {   0x00, 0x00, 0x00, 0x00, 0x01, 0x80, 0x18, 0x00, 0x0f, 0xe0, 0x7f, 0x00, 0x3f, 0xf9, 0xff, 0xc0,   0x7f, 0xf9, 0xff, 0xc0, 0x7f, 0xff, 0xff, 0xe0, 0x7f, 0xff, 0xff, 0xe0, 0xff, 0xff, 0xff, 0xf0,  ...

How To Make Wi-Fi Car With NodeMCU| NodeMCU Projects| Topped With Fun

Circuit Diagram:  Code: #define ENA   14           // Enable/speed motors Right        GPIO14(D5) #define ENB   12            // Enable/speed motors Left         GPIO12(D6) #define IN_1  15            // L298N in1 motors Right           GPIO15(D8) #define IN_2  13            // L298N in2 motors Right           GPIO13(D7) #define IN_3  2             // L298N in3 motors Left            GPIO2(D4) #define IN_4  0             // L298N in4 motors Left            GPIO0(D3) #include <ESP8266WiFi.h> #include <WiFiClient.h>  #include <ESP8266WebServer.h> String command;  ...

Obstacle Avoiding Car With Ultrasonic Sensor|Autonomous Car Using L293D Motor Driver|Topped With Fun

Download The Libraries Here:- Motor-Shield-l-master Arduino-NewPing-master Circuit Diagram:- Code:- #include <AFMotor.h>   #include <NewPing.h> #include <Servo.h>  #define TRIG_PIN A4  #define ECHO_PIN A5 #define MAX_DISTANCE 200  #define MAX_SPEED 190 // sets speed of DC  motors #define MAX_SPEED_OFFSET 20 NewPing sonar(TRIG_PIN, ECHO_PIN, MAX_DISTANCE);  AF_DCMotor motor1(1, MOTOR12_1KHZ);  AF_DCMotor motor2(2, MOTOR12_1KHZ); AF_DCMotor motor3(3, MOTOR34_1KHZ); AF_DCMotor motor4(4, MOTOR34_1KHZ); Servo myservo;    boolean goesForward=false; int distance = 100; int speedSet = 0; void setup() {   myservo.attach(10);     myservo.write(115);    delay(2000);   distance = readPing();   delay(100);   distance = readPing();   delay(100);   distance = readPing();   delay(100);   distance = readPing();   delay(100); } void loop() {  int distanceR = 0; ...